
Networking
One VIGI NVR Across Multiple Sites: Remote Registration Explained
Record compatible remote VIGI cameras on one central NVR. See genuine settings screens, check network reachability, calculate upload and SIM data, and plan recording recovery.
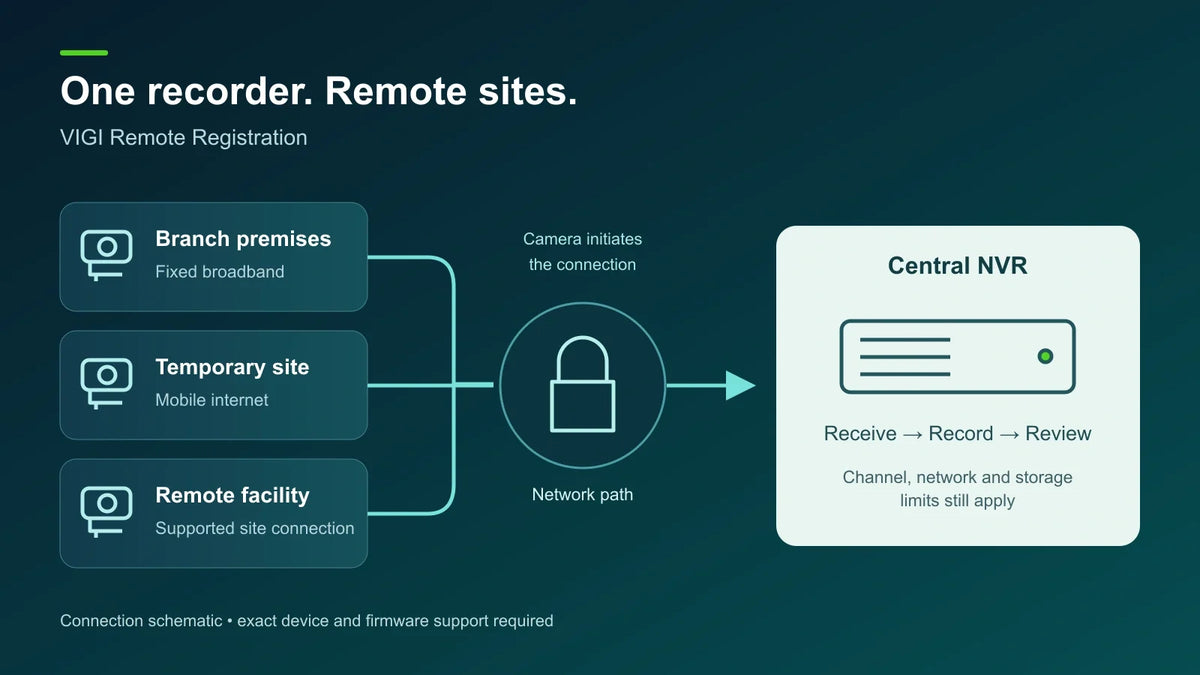
Supported VIGI cameras can register with a central NVR across different sites, so recordings arrive at the recorder instead of an external cloud repository. The camera starts the connection. You still need compatible firmware, a reachable NVR-side network and enough upload capacity at every remote site.
A shop owner wants the yard camera’s footage stored at the main office. A temporary site has 4G, but no sensible place for a recorder. These are useful reasons to consider Remote Registration. Start by deciding where the evidence must survive, then check the complete connection.
Central Recording and Remote Viewing Are Different Jobs
-
Camera connection
The remote camera finds the NVR through the configured network path.
-
Central recording
The NVR retains the streams covered by its recording settings.
-
Operator access
An authorised person views, searches or exports the required footage.
Seeing several sites in an app does not establish where their recordings live. Remote Registration addresses the camera-to-recorder link. It can put received footage away from the camera’s location, but one central recorder also becomes a shared dependency. Protect its power, disks and access, and keep a separate plan for important evidence.
If the problem is only that the phone cannot connect away from the premises, use the remote CCTV viewing guide first.
Check the NVR-Side Network First
For TP-Link’s documented public-network method, the NVR must be reachable from the camera. When the NVR has a private address, its router needs a public address and mappings for the NVR’s management and remote-stream ports. The camera uses the router’s external address and mapped ports.
Default ports are 6000 for management and 6005 for the remote stream. Confirm the actual values in the NVR. Keep the recorder behind a managed gateway, restrict access where the network permits and avoid using a broad DMZ as a shortcut.
DDNS supplies a name for an address; it does not remove carrier-grade NAT or an extra upstream router. If the receiving site lacks usable inbound reachability, settle the ISP and routing design before installation. A private routed or VPN design needs its own compatibility and network assessment. Do not assume it behaves like a cloud relay.
The Two Settings Screens That Matter
1. Prepare the Recorder
On a supported NVR, open Settings → Camera → Remote Registration. Enable the feature and create a strong, unique verification code accepted by the interface. Record the management and remote-stream ports for the network design.

2. Point the Camera at the Recorder
In the camera’s Remote Registration settings, enter the NVR-side IP address or domain, the reachable port values and the matching verification password. Apply the settings and inspect the connection status.

Then check Settings → Camera → Device Access on the NVR. First-time automatic addition can depend on matching NVR and camera login passwords; otherwise supply the camera’s correct credentials. A registration code and a camera login password do different jobs. If a device was removed, use the supported remote scan and Add workflow to register it again.
A Small Stream Can Use a Large Mobile Allowance
Size the remote site’s upload and the central site’s incoming capacity. A high download figure on a broadband plan does not answer the upload question. Allow for other users, variable scene complexity, protocol overhead and any recording recovery traffic.
For a planning example, take one continuous 2 Mb/s stream. The arithmetic, before overhead, is:
Four such cameras total 8 Mb/s and about 2.59 TB over 30 days. These are decimal data-rate calculations, not measured camera usage or a recommended quality setting. Event recording, compression and scene changes can alter actual consumption. Check the SIM’s allowance, throttling and upload performance before choosing continuous central recording.
Match the NVR’s channel count and incoming bandwidth to the combined streams. Use the 30-day NVR storage guide to connect that traffic estimate to retention and disk capacity.
What Happens When the Internet Stops?
The central recorder cannot receive new video while the path is unavailable. ANR, Automatic Network Replenishment, can retrieve supported local camera recordings after reconnection. It requires compatible camera and NVR firmware, a working camera SD card and an NVR hard drive.
Where supported, ANR appears under Settings → Storage → Recording Schedule. Enable it and synchronise the recording schedule to the camera as required. TP-Link’s current guide specifies retrieval of up to the most recent seven days held on the camera, subject to the footage still being available. Free card capacity can impose a shorter practical window.
Retrieval may pause when storage is unavailable or bandwidth is busy. Check playback across the interruption and the ANR start/end logs. A power failure, overwritten SD recording or stolen camera before retrieval is not automatically repaired by ANR.
Choose the Hardware and Firmware Together
The model name alone is insufficient. Check the label’s hardware revision, purchase region and installed firmware, then confirm that both ends expose Remote Registration. For example, the Singapore release notes add the feature to NVR2016H V2 in 1.3.0 Build 250123. That is a feature-introduction reference, not a recommendation to install that older release.

A central-recorder example in the current catalogue. Match the hardware revision, supported firmware, channel load and storage requirements.

A 4G camera example for a site without fixed broadband. Verify the regional revision, supported firmware, SIM, local storage and power arrangement.
The current Remote Registration guide includes C540-4G among its camera families. That does not establish ANR support for every camera/NVR revision. In particular, a firmware feature listed in another region is not permission to cross-flash your device. Confirm a supported regional combination before depending on outage recovery.
For mixed-brand cameras, the ONVIF compatibility guide explains why video, events and analytics need separate checks.
Prove the Recording Before Adding More Sites
- Start with one camera. Confirm the intended recorder entry and a recent retained recording, not only a live picture.
- Check the evidence. Review timestamps, required detail, audio if needed and a short playable export.
- Observe the busy period. Check recording while the site’s other users and traffic are active.
- Test the agreed outage response. In an authorised maintenance window, verify local recording, reconnection and any ANR retrieval without formatting working storage.
- Check the next day. Confirm storage growth, retention, alerts and who is responsible when a camera stops arriving.
Keep camera and recorder credentials unique and controlled. Limit operator permissions to the work required, keep supported firmware current and retain configuration records privately.
Common Questions
Can one VIGI NVR record cameras at different sites?
Yes, with supported Remote Registration hardware and firmware, a reachable NVR-side network and sufficient channels, bandwidth and storage. Each remote camera still needs stable power and internet access.
Do I need a cloud-storage subscription?
Remote Registration sends recordings to your NVR rather than requiring an external cloud recording repository. Broadband or SIM data, local SD cards and recorder storage remain separate costs. Phone-app access is a separate function.
Will any ONVIF camera support this method?
Do not assume so. Remote Registration is a VIGI feature. A third-party ONVIF camera needs its own supported connection design; video compatibility alone does not establish remote registration or ANR support.
Does Connected mean the footage is safely recorded?
No. Check a recent recording, its schedule, timestamps, playback and export. Also test the agreed outage response. A connection status describes the link, not your retention or recovery result.
Use central recording when its offsite evidence and operating convenience justify the continuous network load. Where a remote link is unreliable or metered, compare that design with local recording and selected central viewing. Bring the camera count, required retention, site connections and exact hardware revisions to a Sales Specialist so the complete path can be checked.


